When you create a Project or an Organization, it is mandatory to associate at least one contact. It will appear on your Project page under the "Contact" tab, and will ensure there is a means of communication between the visitors and someone responsible for the Project or Organization.

Managing contacts
To manage the contacts of a Project, navigate to the Project Management Panel and select "Contacts" on the menu on the left. This will open the Contact Management Page.

Editing existing contacts
Choose the contact entry you want to edit and click on the “Edit Contact” icon to open the edit form.

Fill out the fields as needed. Note that it is mandatory to fill out at least one of the following three fields: Email, Phone or Webpage.
Use the Location field to type in an address. Further down, we explain how to generate coordinates for that address.
Conclude by clicking on the "Update Contact" button, or discard changes by using the "Cancel" button.

Creating new contacts
It is possible to add more than one contact to a Project. To create a new contact, click on the plus icon on the top right of your Contact Management Page.

Sorting contacts
You can also change the order in which the contacts appear. Just click on the "arrows" icon (1) to open the "Reorder Contacts" pop-up window, and then use the "stripes" icons (2) to drag and drop the contacts to the desired position.
Conclude by clicking on the "Save" button, or discard changes by using the "Cancel" button.

Setting the Main Contact
The first contact added to your Project becomes by default the Main Contact. If you wish to change that, just click on the "three dots" icon on the relevant contact, and select the "Set as main Contact" option.

Note: When there is a reference to an Organization in a Project, the system will automatically get the Main Contact information.
Deleting Contacts
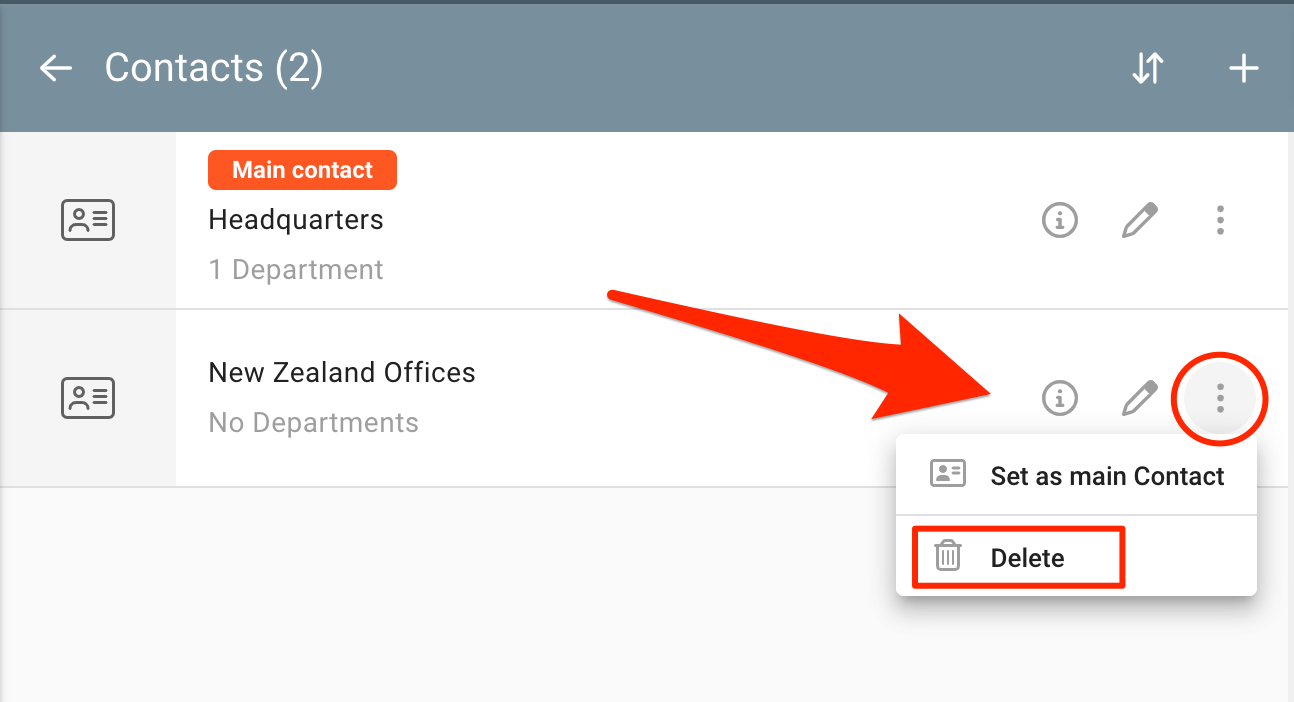
In order to delete a Contact, just click on the "three dots" icon on the relevant contact, and select the "Delete" button.

Conclude by clicking on the "Delete" button, or discard changes by using the "Cancel" button.

Managing Departments
Departments are sub-entries of a Contact. It is possible to create several Departments within a Contact, enabling a more targeted communication channel with specific members of a Project.
Create a Department
Click on the "show content" icon on the desired contact to show all information related to it.

On the bottom, click on the “plus” icon in the Departments section.

A form will open. Fill in the Department's Title, the name of the person representing the Department, and at least one contact field (Email, Phone or Webpage).
Conclude by clicking the “Save” button, or discard any changes by using the “Cancel” button.

Sorting Departments
As with the contacts, if you have more than one department you can also change the order in which they appear. Start by clicking on the "arrows" icon.

Then, on the "Reorder departments" pop-up window, use the "stripes" icon to drag and drop the departments into the desired position.
Conclude by clicking the “Save” button, or discard any changes by using the “Cancel” button.

Deleting Departments
To delete a Department simply click on the "bin" icon of that specific department (1), and conclude the action by clicking the “Delete” button (2) on the pop-up window that opens up, or discard any changes by using the “Cancel” button.

Managing Locations
As previously mentioned above, while editing the Contacts you can also set a location for each of them. Start by typing the relevant address in the search box that appears on the upper right side of the screen

When the address is found in the search results, it will appear written in the Location field and with the specific coordinates, enabling the contact's geolocation on the map. In case you don't want to have either the written address or the coordinates, you can remove them by clicking on the respective green icons.
Conclude by clicking the “Apply” button, or discard any changes by using the “Cancel” button.

If you don't like the way the address appears written, you can manually rewrite it according to your preference directly in the address field, while keeping the coordinates so that the location on the map remains intact.
Conclude by clicking the “Update Contact” button, or discard any changes by using the “Cancel” button.

Note: In the Projects (although currently not very relevant) it is important to set the Main Contact's location, for features that will be launched in the future. In the Organizations, it is important to set the Main Contact's location, to make them appear on the map of any Umbrella Organization they might be members of.